Controlling Tuya lights with Arduino and ESP8266
I’ve created a physical controller for the cheapest RGB lighting available in Poland. Do it yourself - code and circuit designs included!
Introduction
I own 3 RGB light bulbs that are managed using the Tuya Smart app. The control doesn’t happen on the local network, as instead the lights connect to the manufacturer’s servers. A public API allows the owner to control hue, brightness, and the power using simple requests. This workflow is unsettling. IoT devices make for an unnecessary attack vector against a home network. I don’t need to control lights if I’m out of range of my Wi-Fi network. I’ve decided to make the best of this situation and control my light bulbs with a script ;)
The main driver behind this project was the sluggish Tuya Smart app which doesn’t allow for predefined scenes nor to turn off all lights at once. My ultimate goal was to speed up the change of colors from over a dozen clicks to a single one. I’ve accomplished it in two hours by writing a desktop application running on Python and tinytuya & eel libraries.
As it turns out, controlling the lights from a desktop isn’t handy. The application worked well only when I was already using my laptop. For the most part of the day I was stuck with Tuya Smart. That’s how I got an idea to create a physical controller to control the lights :)
Project architecture
Sending a few commands to API after a single button press was the main project assumption. The scenes should differ and be easily modifiable. Due to using already possessed components I’ve ran into a few limitations.
I’ve used ESP-01 (based on the SoC ESP8266EX) to connect to and use the Wi-Fi network - no more, no less. The small number of GPIO pins restricted me from using a 4x4 matrix as an input. In order to handle I/O I’ve used an Arduino UNO.
Arduino and ESP-01 can communicate via the serial ports. Crossing the TX/RX pins allows the devices to transmit data to themselves. After user presses a button, Arduino sends accordingly mapped characters to the ESP-01 as a command, receives connection status as a result, and controls 3 LEDs to signal to the user.
To simplify the configuration I’ve used my previously created Python script. I’ve adapted it to a PHP wrapper which handles the network requests. There’s a very simple security measure in-place, as I’ve hardcoded a password both in the ESP-01 and PHP code. The wrapper runs on a genesis13.kaszkowiak.org subdomain - let there be light ;)
The reason for this set-up is that modifying scenes shouldn’t require a ESP-01 reflash. Creating an additional layer of abstraction simplifies the ESP-01 code and allows me to easily tinker by connecting to my VPS. It introduces an additional dependency of kaszkowiak.org uptime, which I consider a small price for the upsides.
Programming the ESP-01 via Arduino
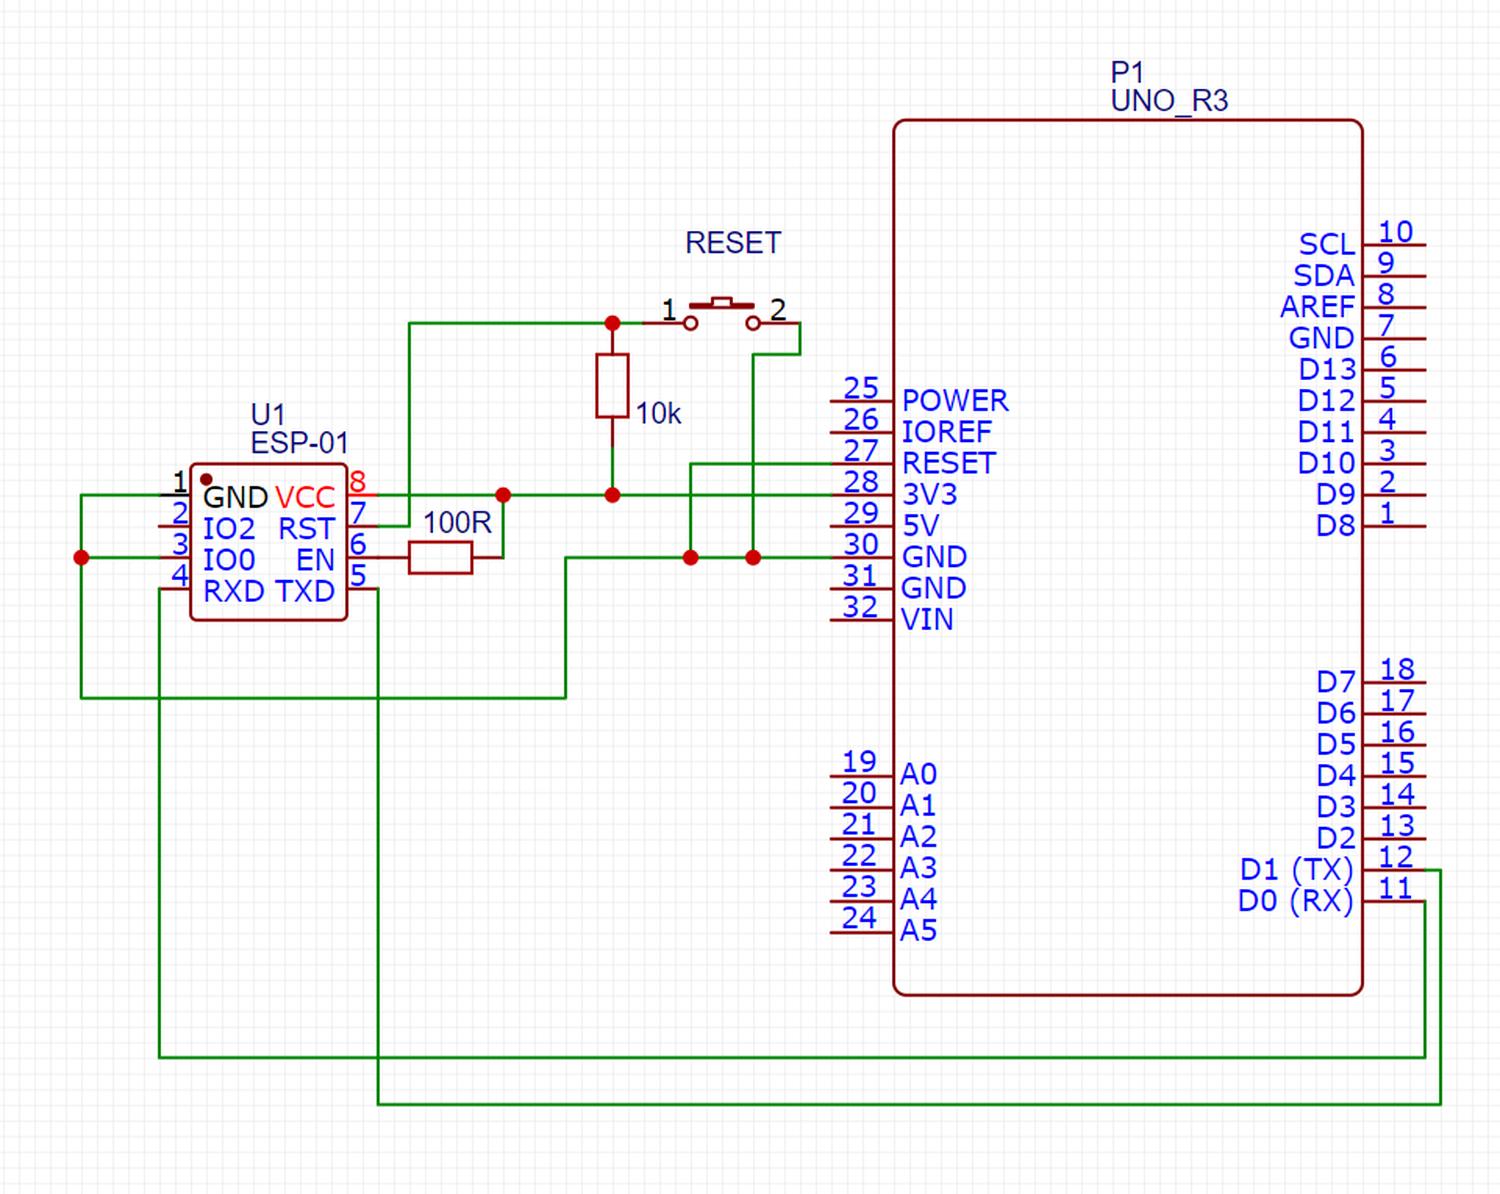
The first step to create the project is programming the ESP-01. I’ve used Arduino connected to a PC for that purpose. After connecting TX-TX and RX-RX pin pairs we can use the Arduino application to program the ESP-01.
Below I attached my circuit design, which requires a few comments. Firstly, switching the ESP-01 into a programming mode requires grounding the GPIO-0 pin. Before each program upload we must provide low state into the RST pin. I’ve used a pull-up resistor (10k), so pressing the button will reset the module.
I’ve also grounded the RESET pin in Arduino, as required for direct communication between the PC and the ESP-01.
After building the circuit we can program the ESP-01 via the Arduino application. In order to do so we must open Preferences and paste this URL into the “Additional Boards Manager URLs” field. Restart the application, open Tools > Board > Boards Manager, and install “esp8266” in the 2.5.0 version. Newer versions have unclear error messages and cause issues during uploading the code according to a Github discussion. Once the installation is finished, select “Generic ESP8266 Module” in the Tools > Board menu and set the Builtin Led value to “1”.
We now can test if the circuit works correctly by running the Blink code from the File > Examples menu (remember to press the Reset button before uploading the code). The built-in LED in ESP-01 should start blinking.
ESP-01 source code
The above program uses the serial port to communicate, which means we can test it via the Tools > Serial Monitor tab. Remember to select the correct data rate (115200 baud). Here’s how it works: ESP-01 waits until it receives an uppercase letter or a number. The received character is then appended to the end of a hardcoded URL as a parameter. ESP-01 then makes a GET request and returns the connection status as an uppercase letter: R/Y/G - Red / Yellow / Green.
After programming the ESP-01, we can now program the Arduino using a standard connection via an USB cable.
Arduino source code
Arduino maps input from the 4x4 keypad to selected characters, sends them via the serial port, and lights up LEDs upon receiving serial input. I/O processing is asynchronous. After programming the Arduino we can connect it with the ESP-01.
Final circuit design
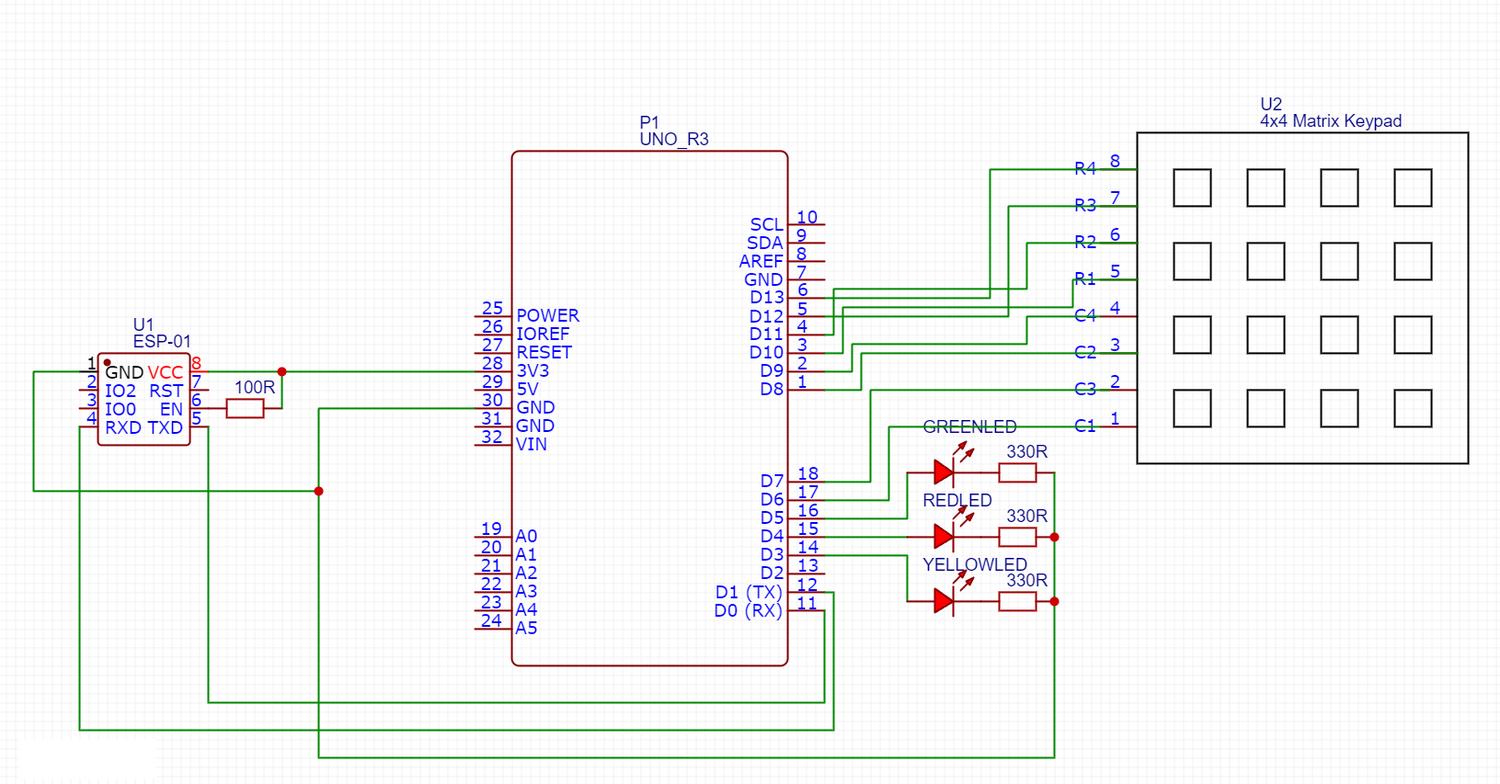
The final circuit design slightly differs from the ESP-01 programming circuit. First of all, I’ve removed the RESET button in order to not accidentally delete an uploaded program. I’ve also disconnected Arduino RESET and ESP-01 GPIO0 pins from ground. The TX/RX pins are now crossed, so Arduino now communicates by passing its output (TX) into the ESP-01 input (RX) and vice versa.
After powering the circuit the red LED should flash, and after a few seconds all lights will follow.
Server-side request processing
Source code - PHP 7
The PHP script plays a small purpose. It authorizes the request based on a built-in password and passes the selected scene into the tuyalights script. The scene is limited to numeric values in order to create a simple RCE preventive measure.
The code works, however it should be noted that the GET request type is misused and a POST would generally work better. In this specific scenario it shouldn’t cause any harm, but as an example - browsers can duplicate or preload GET requests by themselves (Safari is known for this). We wouldn’t want our lights changing randomly, would we? ;)
Source code - Python 3
The scenes are defined and bound to IDs in the tuyalights script. Based on their data API requests are created and sent. A small disclaimer: the script was hacked together based on existing code, its quality can be improved. For example, you might want to read scenes and API secrets from an external data source.
For my deployment purposes I’ve placed the file in my /usr/bin directory (which is in PATH), so executing the script doesn’t require a direct path. Omitting this step might cause an error in the PHP script. I strongly do not recommend placing the script in the same directory as the index.php file, as a wrong server configuration might permit downloading the script, and therefore your secrets could leak.
The script requires the tinytuya library (python3 -m pip install tinytuya). I’ll mention that in in its docs you can read how to get your devices’ IDs and the API secrets.
This entire project is available on my Github - full code along with PDF schematics. Thanks for reading!
You can follow my blog with any
 RSS reader!
Maciej Kaszkowiak
I try to write about interesting things, such as artificial intelligence, created projects, and travel - see all posts.

Query rewriting - refine user queries
What is query rewriting? Why is it useful whenever you build a chatbot? How to implement it? Read the article!

BM25: keyword search
Improve search in your application! Implement BM25: discover how it works, learn about potential issues, and get practical advice 🚀

Even your cat poem generator requires proper tests
Benchmark your AI application. Learn why and how to do that!